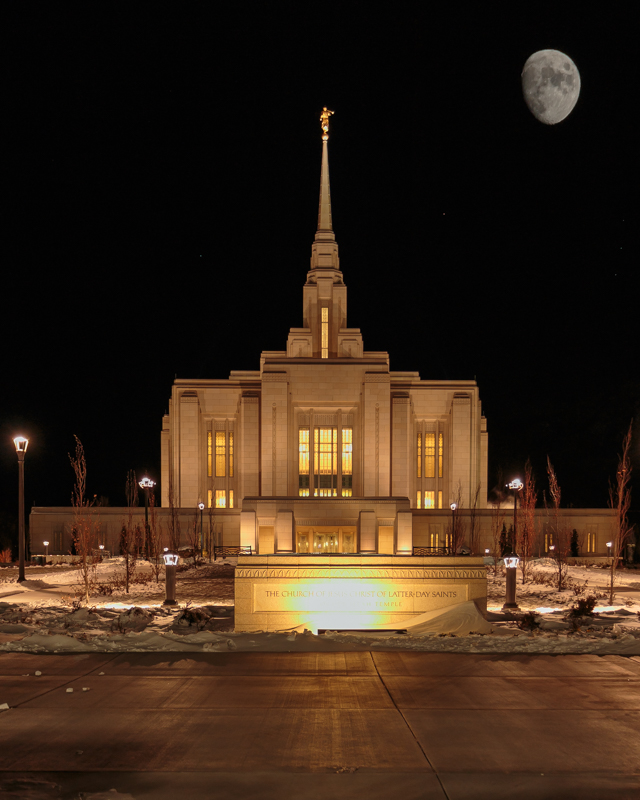
Welcome to my first “Teaching point” article. In this series I plan to post a new photo and provide the camera settings and a detailed description of the how and why for the image. It is my hope that this will help aspiring photographers to see the photo process and inspire them to experiment and grow as photographers.
This weeks image is a picture of the newly renovated Ogden, Utah LDS temple:

several years ago I created a similar image of the Ogden Temple that was a double exposure using a film camera. The process is a composite of two images that are taken on the same single frame of film. By not advancing the film between the two images, the images are combined. Now we tend to do this kind of compositing in Photoshop, which is much easier. However, the Canon 70D offers multiple expsosure as an option and I was excited to try it out.
Both images were shot in Manual mode. For the month of January I am striving to shoot only in Manual. I tend to prefer to use shutter priority and aperture priority modes on my cameras, however, I like to challenge myself every so often to only shoot in manual. I do miss a few shots due to the additional settings that need to be managed, but I love the process of shootings in manual since it forces me to slow down and really consider the settings I am using more carefully.
The specs for the images are as follows:
Temple image
Shutter: .5 sec
Aperture: f/3.5
ISO: 100
White Balance:Tungsten
Moon Image
Shutter: 1/250
Aperture: f/11
ISO: 200
White Balance: Daylight
I used the good old “Moony 11” rule for the moon shot, 1/ISO at f/11. Because the moon is lit by the sun, I used the Daylight white balance preset.
The camera was on a tripod for both images, but I shot the temple at 18mm and the moon at 135mm to make it appear larger in the image. I cropped in on the image to a 4:5 aspect ratio so that it can be printed and put in a standard frame (8×10, 11×14, etc).
the double exposure process is much easier with digital, especially when using live view to compose the second image since the camera shows the first image on the screen, making it easier to visualize the final shot before committing to it.
I used the lens profile correction settings, and removed the purple fringing from some of the highlights in Lightoom I was careful in applying my sharpening and used the masking slider to keep the noise in the sky to a minimum. I love the sharpening tools in Lightroom for this reason. I also applied perspective correction to fix the appearance that th building is falling backwards.
I plan to revisit this image again this year when the flowers are in bloom and there is a full moon. It was extremely cold when I created this image, and that caused me to rush a bit. Also, I might need to do a bit of an HDR since the sign in the foreground is blown out in the center. I noticed this when I was reviewing the histogram and blinking highlights in the field, but since this was more a chance to test out the double exposure feature of the camera I didn’t worry about it at the time. Doing tests like this helps you to become more aware of what to look for when creating pictures under similar circumstances in the future.

