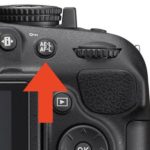
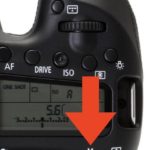
Back button focusing is a unique concept that is not widely understood by beginning photographers. Most of my students that ask about it do so after they read about it online and ask how to set it up, but don’t really understand how it works or what the advantages and disadvantages are. This article will discuss everything you need to know about back button focusing so you can decide if it is right for you.
How Auto Focus Works
Before we talk about back button focusing you need to understand the basic principle of how auto focus works on a DSLR camera. Focusing is activated by pressing the shutter button halfway by default. Depending on the focusing mode you have selected your camera will either lock focus or start focus tracking.
Focus Lock vs Focus Tracking
If your subject is not moving you will want to use focus lock. This allows you to focus on your subject by pressing the shutter button half way and holding it. On Canon cameras this is the “one-shot” focusing mode and and Nikon and Sony cameras this mode is AF-S or AF-Single. As long as you press the shutter button and hold it the focus will not change until you let off the shutter button and press it halfway again. Many professional photographers utilize this focus method as it allows them to set their focus point and then do the focus lock and recompose technique.
If your subject is moving you should use the focus tracking mode on your camera. On Canon cameras this is the AI-Focus mode. Nikon and Sony cameras refer to this mode as AF-C or AF-Continuous. When you press the shutter button halfway the camera starts focusing and continues to adjust focus until you fully depress the shutter button or take your finger off the shutter button.
The Problem
So which mode should you use? Single or continuous auto focus? If you have been in one of my classes, then you know my answer is usually, “it depends”. If your subject is moving then set your camera to focus tracking and if your subject is not moving select focus lock. Before I started using back button focus I would keep my camera set to continuous auto focus as my “default” setting. The reason is pretty simple. If I encounter a photo opportunity and my subject is moving, I am already in focus tracking mode and don’t risk missing the photo because I am switching from single auto focus to continuous. If my subject is not moving I have time to change my focus mode, shoot and then change it back. And then I discovered “back button focusing”.
Back Button Focusing Advantage


Back button focusing gives us a way to do both focus tracking and focus lock without having to change the camera’s focus mode. Instead of using the shutter button to activate the focusing, you set a button on the back of the camera to be your auto focus. On most Canon cameras this is the asterisk button. On most Nikon and Sony cameras it is the AEL/AFL button. By default this button is used to lock your exposure setting. Some of the more advanced Canon and Nikon cameras have a button labeled “AF-On” that can be used if you prefer.
With this method you set your camera to focus tracking and leave it there. When you press the back focus button your camera will start tracking your subject. When you need to lock focus you simply let off the focus button and it will stop tracking. This effectively locks your focus.
Another advantage to back button focusing is when you use lenses that support full time manual focus override. You don’t have to worry about the camera overriding your manual focus when you press the shutter button halfway.
The Challenge
I started using back button focus on my Sony A6000 recently and the biggest hurdle for me was changing the button I press to focus after 30 years of using the shutter button to activate my focus. During this time I had photos that looked in focus in the viewfinder, but when I reviewed them later discovered the focus was just off enough because I forgot to activate the focus. I am having to retrain myself to use the back button, but the more I get used to it the more I like it.
What About Exposure Lock?
Once you set your camera to use focus lock, you may notice that you don’t have the option to lock your exposure any longer. The back button focus is usually used for the exposure lock. When you set your camera to use back button focus you also move your exposure lock to the shutter button. This way you can still take an exposure reading and recompose your image in tricky situations.
How to Set Up Back Button Focusing
Here you will find instructions on how to set up back button focusing for most Canon, Nikon and Sony cameras. Different models may have different menus and names for the settings, but should be close enough for you to figure out your specific camera.
How to Set Up Back Button Focusing for Canon Cameras
1. Set your camera to any of the creative exposure modes (P, Av, tv or M).
2. Press the “Menu” button.
3. Navigate to the custom functions menu (orange camera icon).
4. Look for the function titled, “Shutter/AE Lock Button”.
5. Select the option, “AE Lock/AF”. This sets the shutter button to Exposure lock and the asterisk button to focus on.
6. Press the “OK” button.
7. Set your camera’s auto focus mode to AI-Focus to enable focus tracking mode.
How to Set Up Back Button Focusing for Nikon Cameras
1. Set your camera to any of the creative exposure modes (P, A, S or M).
2. Press the “Menu” button
3. Navigate to the custom settings tab (Pencil icon).
4. Navigate to “Assign AE-L/AF-L button” in the “controls” sub menu.
5. Select “AF-On”. This sets the AE-L/AF-L button to activate your auto focus.
6. Navigate to “Shutter release button AE-L” in the “Timers/AE Lock” sub-menu.
7. Select “On”. This sets the shutter button to exposure lock.
8. Set your camera’s auto focus mode to AF-C to enable focus tracking mode.
9. Set your camera’s auto focus area to “3-D Tracking” for best results.
How to Set Up Back Button Focusing for Sony Cameras
1. Set your camera to any of the creative exposure modes (P, A, S or M).
2. Press the “Menu” button
3. Navigate to the “settings” menus (Gear icon)
4. Navigate to “Custom Key Settings”
5. Set the “AEL Button” setting to “AF On”. This sets the AE-L button to activate your auto focus.
6. Press the “OK” button
7. press the “Menu Button”
8. Navigate to the “AEL w/Shutter” setting
9. Select “On”. This sets the shutter button to exposure lock.
Conclusion
This will take some getting used to but once you do you will enjoy one less setting you need to change when shooting stills and moving subjects. The best thing to do is to practice focusing daily to develop the muscle memory to press the button on the rear of the camera to activate your auto focus.

